# Use the Xpress Mode
You can create a Virtual Machine (VM) using the **Xpress** mode in the left navigation panel or from the DCD home page.
## Option 1: From the left navigation panel
{% stepper %}
{% step %}
In the **DCD**, go to **Menu** > **Virtual Data Centers**.
{% endstep %}
{% step %}
Set **Create mode** to **Xpress**.
{% hint style="success" %}
**Result:** The label changes to **Create in Xpress**.
{% endhint %}
{% endstep %}
{% step %}
Click \*\*Create in Xpress\*\* to create and configure the data center through a guided setup.

{% endstep %}
{% step %}
#### Select the Virtual Data Center (VDC)
Select the [VDC](https://docs.ionos.com/cloud/support/general-information/glossary-of-terms#virtual-data-center-vdc) where you want to configure an instance. You can either create the instance in a new VDC or add it to an existing VDC.
* **Create an instance in a new VDC:** Start with a new VDC:
* **Name:** Enter a name for the new VDC.
* **Description (optional):** Add information that describes the VDC.
* **Location:** Select a geographic data center location where you want to create your instance considering latency to your end-users and data residency requirements. The data center defined as your default data center in [your settings](https://docs.ionos.com/sections-test/guides/set-up-ionos-cloud/account-management/dcd-default-settings) is selected automatically.
* **Add instance to existing VDC:** Select an existing VDC from the drop-down list to expand existing infrastructure or group related resources.
**Note:** Contract users must have **Edit** permission on the selected VDC before adding instances.
{% endstep %}
{% step %} 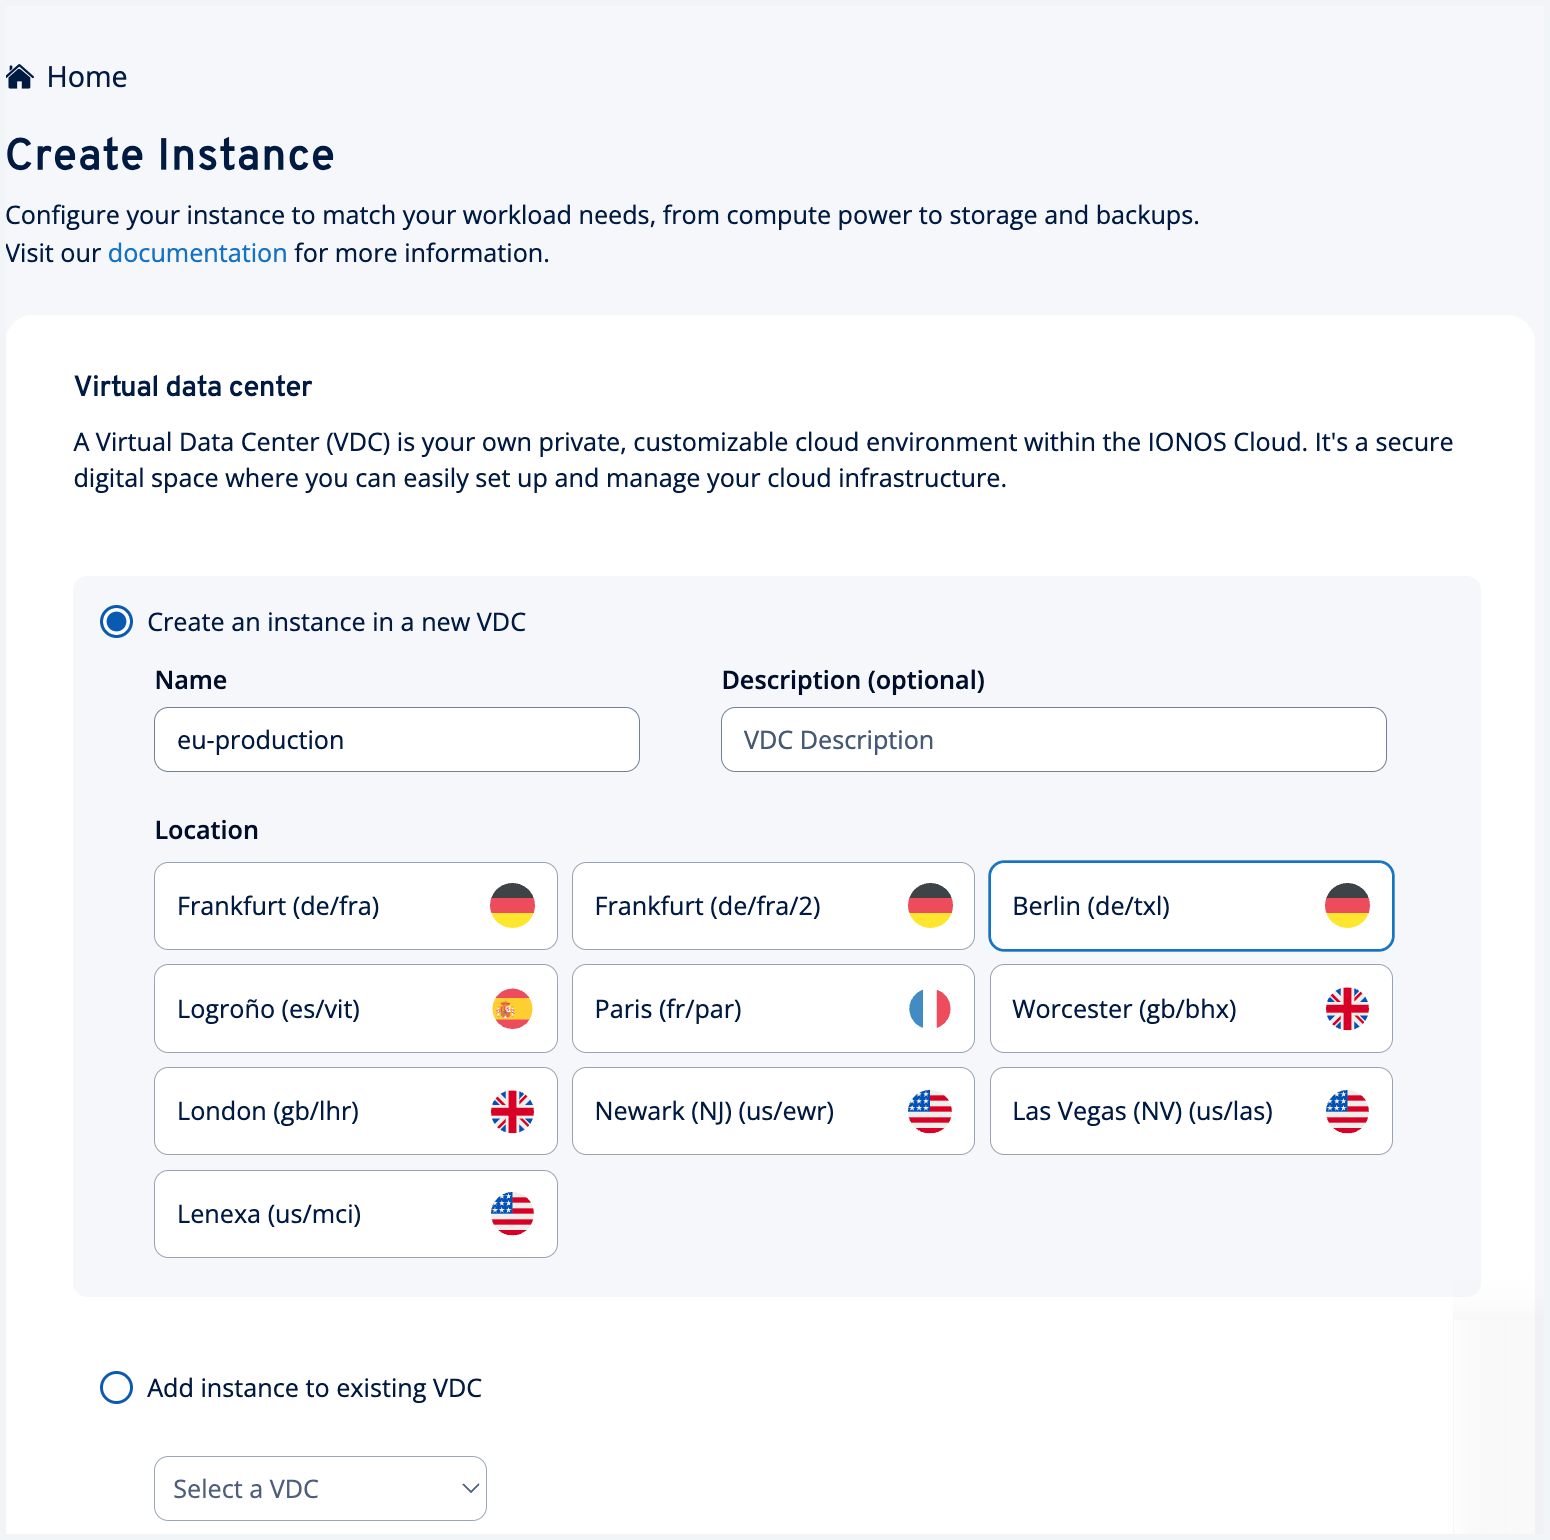 {% endstep %}
{% endstepper %}
#### Configure a Virtual Machine (VM)
Select the right server type that matches your workload requirements:
* **Instance name:** Change the instance name if needed and choose the type of VM most suitable for your workload:
* **Cubes:** Pre-defined templates with fixed vCPU and memory ratios. Cubes provide optimized pricing for balanced workloads, enable cost optimization, and simplify sizing decisions. For more information, see [Cubes](https://docs.ionos.com/sections-test/guides/compute-services/cubes).
* **vCPU Servers:** VMs with vCPUs and memory configurations optimized for general workloads. Choose from presets or create custom vCPU and memory combinations to match your application requirements. Best suited for standard applications, development environments, and general-purpose computing. For more information, see [vCPU Servers](https://docs.ionos.com/sections-test/guides/compute-services/compute-engine/vcpu-server).
* **Dedicated Core Servers:** Customizable dedicated cores and RAM for performance-critical applications, such as high-compute workloads or databases. For more information, see [Dedicated Core Servers](https://docs.ionos.com/sections-test/guides/compute-services/compute-engine/dedicated-core).

#### Add Storage to your chosen VM
1\. **Name:** Specify a name for your storage volume.
2\. **Storage type:** Select [storage type](https://docs.ionos.com/sections-test/guides/storage-and-backup/block-storage/overview) based on your performance needs:
* **HDD:** Cost-effective drives for basic workloads.
* **SSD Standard:** Balanced performance for general workloads.
* **SSD Premium:** High-performance for Input or Output (I/O)-intensive applications.
For more information about the Block Storage elements, see [Storage Performance](https://docs.ionos.com/sections-test/guides/storage-and-backup/block-storage/overview/storage-performance).
3\. **Size:** Specify the storage size in GB (minimum 1 GB and the maximum limit is based on the individual contract limits). You can use the slider, enter a value directly in the text box, or use the arrows to adjust the size.
{% hint style="info" %}
**Note:**
* The specified size may automatically adjust to meet the minimum size requirement of the selected image or snapshot.
* If you plan to use this storage with the [Backup Service](https://docs.ionos.com/sections-test/guides/storage-and-backup/backup-service) by selecting **Enable backup**, you must specify a size that is at least 5 GB larger than the required minimum.
{% endhint %}
4\. Images are of different types: **By IONOS** (public), **Own images** (private), or **Snapshots**.

{% tabs %}
{% tab title="By IONOS (public)" %}
Public images refer to the pre-configured operating system images provided by IONOS Cloud.
1\. Select an image type. You can choose **Windows** or from the following Linux distributions: **Alma Linux**, **Ubuntu**, **Debian**, **Rocky Linux**, **Red Hat Linux**, or **SUSE Linux**. For more information, see [IONOS Public Images](https://docs.ionos.com/sections-test/guides/storage-and-backup/images-snapshots/public-images).
{% hint style="info" %}
**Note:** **SUSE Linux** is only available in German data center locations.
{% endhint %}
2\. **Image Version:** Select an image version from the drop-down list. The image versions differ based on the chosen operating system image type.
3\. **Password:** Enter a password to access your provisioned machine. The password configured is set as the "administrator (Windows)" or "root (Linux)" password for the Virtual Machine (VM). This password provides essential access to the VM, even if network connectivity is unavailable. The password must contain 8-50 characters alphanumeric characters and it is mandatory to create a VM. You can change the password from within the operating system after provisioning, but not through the IONOS Cloud interface.
{% hint style="info" %}
**Note:** Save this password securely. IONOS Cloud never retains passwords after VM generation.
{% endhint %}
{% endtab %}
{% tab title="Own images (private)" %}
Select the image that you have uploaded to the specific data center in IONOS Cloud. A private image is a custom OS image, either from a non-IONOS Cloud source or pre-configured with your own software.
If you have not uploaded any images yet, we recommend uploading your custom images through the File Transfer Protocol (FTP). For more information, see [Private Images](https://docs.ionos.com/sections-test/guides/storage-and-backup/images-snapshots/private-images).
{% endtab %}
{% tab title="Snapshots" %}
Select a custom snapshot from the drop-down list to create a new instance from a previously created snapshot. Only snapshots created in the same region as your data center configuration will display in the list. Snapshots from other regions are not listed. For more information, see \[Snapshots]\(../../storage-&-backup/images-snapshots/snapshots/snapshots.md).
{% endtab %}
{% endtabs %}
5\. **Add another data volume:** *(Optional)* Click **Add another data volume** to add an additional volume when you want to store data on a volume separate from your boot device. In the **Add another data volume** view, specify a name, select the type, and specify the size. Click **Save** to confirm.

#### Enable backup to secure your data
{% hint style="info" %}
**Note:** This option is available for instances created from IONOS public images. It is not available for instances that are using private images, or own images, or snapshots. However, for these instances, you can install the backup agent manually after creation. For more information, see [Install Acronis Backup Agent on Windows Server](https://docs.ionos.com/sections-test/guides/storage-and-backup/backup-service/how-tos/install-acronis-backup-agent-windows) and [Install Acronis Backup Agent on Linux](https://docs.ionos.com/sections-test/guides/storage-and-backup/backup-service/how-tos/install-acronis-backup-agent).
{% endhint %}
The Xpress mode automatically [creates a backup unit](https://docs.ionos.com/sections-test/guides/storage-and-backup/backup-service) and adds the instance to the newly created backup unit. After provisioning, you can [access and manage the backup unit](https://docs.ionos.com/sections-test/guides/storage-and-backup/backup-service/how-tos/manage-backup-units) from the **Backup Service Console**. Enable this feature for production environments that require disaster recovery or for any VM with critical or irreplaceable data.

{% hint style="info" %}
**Note:** Backup supports **Public LAN type** as it requires internet connectivity to access backup storage.
{% endhint %}
#### Advanced settings to connect to your VMs
Connect to your VMs securely using either [Secure Shell (SSH) key](https://docs.ionos.com/sections-test/guides/compute-services/cubes/dcd-how-tos/connect-vm-via-ssh) or [Cloud-init script](https://docs.ionos.com/sections-test/guides/compute-services/cubes/dcd-how-tos/boot-cloud-init).
{% hint style="info" %}
**Note:** This option is available for Linux-based VMs only and is not applicable to Windows-based VMs.
{% endhint %}
{% tabs %}
{% tab title="SSH key" %}
\*\*SSH Keys\*\* provide secure access to Linux VMs using public key authentication. To set up SSH key authentication, first generate an SSH key pair if you do not have one, then paste your public key into the provided field, and connect to your VM using your private key.
1\. Select the **SSH key** tab and click **Add SSH key**.
2\. In the **Add SSH Key** view, you can paste your generated public key or press and drag the file containing the SSH key.
3\. Click **Add key**.

{% endtab %}
{% tab title="Cloud-init Script" %}
\*\*Cloud-init\*\* is an industry-standard method for VM initialization, best-suited for automated deployments, infrastructure-as-code, and configuration management. It enables you to automate user creation and SSH key injection, install packages, execute scripts on first boot, and configure network settings.
1\. Select the **Cloud init script** tab and click **Add cloud-init Script**.
2\. In the **Add Cloud-init Script** view, you can paste your key or press and drag the file containing the cloud-init script.
3\. Click **Add script**.

{% endtab %}
{% endtabs %}
#### Network Interface
You can configure how your VMs connect to the internet. For more information, see [VDC Networking](https://docs.ionos.com/sections-test/guides/network-services/vdc-networking).
1\. **LAN type:** Select a network connection:
* **Public**: Select this option if you want the VMs to be directly accessible from the internet. Ensure that you configure a firewall for security reasons.
* **Private**: Select this option if you want the VMs to be accessible from the internal network but not accessible from the internet. It ensures maximum protection without public exposure.
{% hint style="info" %}
**Note:** The **Private LAN** option is available only when **Enable backup** is not selected, because backup requires **Public LAN type** for internet access to backup storage.
{% endhint %}
For more information about network connectivity, see [Configure a Private LAN](https://docs.ionos.com/sections-test/guides/network-services/vdc-networking/lan/how-tos/configure-private-lan).
2\. **IP Address:** This option is availble only for **Public LAN** types:
* **Dynamic (DHCP) IP**: Select this option if you want automatically assigned IP addresses for your VMs. Note that the IP addresses may change each time the VM is restarted.
* **Fixed IP**: Select this option if you want fixed IP addresses allocated for your VMs. Note that this selection incurs additional costs per instance. For more information, see [IP Addresses](https://docs.ionos.com/sections-test/guides/network-services/vdc-networking/ip-address).
3\. **Firewall:** Enable or deactivate the firewall rules.
* **Disabled or Enabled:** The firewall is deactivated by default. To activate firewall rules for the selected network interface, toggle the status to **Enabled**. When enabled, the default rules are applied. You can modify or delete these preset rules or add custom rules as necessary to meet your application's security requirements.
* **Add another firewall rule:** Click **Add another firewall rule** to define rules that allow specific traffic.
* In the **Add another firewall rule** view, enter the necessary details and select **Add rule**.
* You can also **Edit** or **Delete** the rules after their configuration by selecting the respective options from the **ACTIONS** column. For more information, see [NIC-based Firewall](https://docs.ionos.com/sections-test/guides/network-services/vdc-networking/firewall).

#### Confirm creation
1\. Before clicking **Create**, review the **Summary** section on the right side of the screen:
* **Configuration summary:** Review your configured settings. Select [Virtual Data Center](#select-the-virtual-data-center-vdc), [VM configuration](#configure-a-virtual-machine-vm), [Volume](#add-storage-to-your-chosen-vm), or [Network](#network-interface) to navigate directly to the respective section and make changes, if necessary.
* **Multi-instance deployment:** Create up to the maximum number of data center instances allowed by your contract limits, all with identical configurations. This feature accelerates deployment by provisioning redundant instances in a single batch, which is ideal for rapidly setting up high-availability environments within the same VDC and LAN.
* **Estimated costs:** Verify the total cost of your selected resources calculated on an hourly or monthly (30-day) basis. This calculation does not include usage-dependent costs such as backup or traffic, as these charges are based on your individual consumption.
2\. Select **Create** to confirm.

{% hint style="success" %}
**Result:** The data center and all configured resources are automatically provisioned. It is mandatory that the browser tab or the page remains open, and you must stay online until provisioning completes. VMs will start automatically unless you specify otherwise. For more information about adding additional elements, see [Next steps (Post-provisioning)](#next-steps).
{% endhint %}
## Option 2: From the DCD home page
Alternatively, you can also create a data center using the following option:
1\. In the **DCD**, go to the **My Virtual Data Centers** section, and select **Xpress** from the **Create mode** drop-down list.
{% hint style="success" %}
**Result:** The label changes to **Create in Xpress**.
{% endhint %}

2\. Follow the steps mentioned in [Option 1: From the left navigation panel](#option-1-from-the-left-navigation-panel).
3\. Select **Create** to confirm.
## Next steps
To add more elements after provisioning, switch to the **Canvas** mode. Press and drag resources from the **Palette** on the left into the **Workspace** to design your infrastructure, configure each resource, and click **Provision** to deploy your changes. For details, see [Configure a Data Center](https://docs.ionos.com/sections-test/guides/set-up-ionos-cloud/get-started/configure-data-center).
{% endstep %}
{% endstepper %}
#### Configure a Virtual Machine (VM)
Select the right server type that matches your workload requirements:
* **Instance name:** Change the instance name if needed and choose the type of VM most suitable for your workload:
* **Cubes:** Pre-defined templates with fixed vCPU and memory ratios. Cubes provide optimized pricing for balanced workloads, enable cost optimization, and simplify sizing decisions. For more information, see [Cubes](https://docs.ionos.com/sections-test/guides/compute-services/cubes).
* **vCPU Servers:** VMs with vCPUs and memory configurations optimized for general workloads. Choose from presets or create custom vCPU and memory combinations to match your application requirements. Best suited for standard applications, development environments, and general-purpose computing. For more information, see [vCPU Servers](https://docs.ionos.com/sections-test/guides/compute-services/compute-engine/vcpu-server).
* **Dedicated Core Servers:** Customizable dedicated cores and RAM for performance-critical applications, such as high-compute workloads or databases. For more information, see [Dedicated Core Servers](https://docs.ionos.com/sections-test/guides/compute-services/compute-engine/dedicated-core).

#### Add Storage to your chosen VM
1\. **Name:** Specify a name for your storage volume.
2\. **Storage type:** Select [storage type](https://docs.ionos.com/sections-test/guides/storage-and-backup/block-storage/overview) based on your performance needs:
* **HDD:** Cost-effective drives for basic workloads.
* **SSD Standard:** Balanced performance for general workloads.
* **SSD Premium:** High-performance for Input or Output (I/O)-intensive applications.
For more information about the Block Storage elements, see [Storage Performance](https://docs.ionos.com/sections-test/guides/storage-and-backup/block-storage/overview/storage-performance).
3\. **Size:** Specify the storage size in GB (minimum 1 GB and the maximum limit is based on the individual contract limits). You can use the slider, enter a value directly in the text box, or use the arrows to adjust the size.
{% hint style="info" %}
**Note:**
* The specified size may automatically adjust to meet the minimum size requirement of the selected image or snapshot.
* If you plan to use this storage with the [Backup Service](https://docs.ionos.com/sections-test/guides/storage-and-backup/backup-service) by selecting **Enable backup**, you must specify a size that is at least 5 GB larger than the required minimum.
{% endhint %}
4\. Images are of different types: **By IONOS** (public), **Own images** (private), or **Snapshots**.

{% tabs %}
{% tab title="By IONOS (public)" %}
Public images refer to the pre-configured operating system images provided by IONOS Cloud.
1\. Select an image type. You can choose **Windows** or from the following Linux distributions: **Alma Linux**, **Ubuntu**, **Debian**, **Rocky Linux**, **Red Hat Linux**, or **SUSE Linux**. For more information, see [IONOS Public Images](https://docs.ionos.com/sections-test/guides/storage-and-backup/images-snapshots/public-images).
{% hint style="info" %}
**Note:** **SUSE Linux** is only available in German data center locations.
{% endhint %}
2\. **Image Version:** Select an image version from the drop-down list. The image versions differ based on the chosen operating system image type.
3\. **Password:** Enter a password to access your provisioned machine. The password configured is set as the "administrator (Windows)" or "root (Linux)" password for the Virtual Machine (VM). This password provides essential access to the VM, even if network connectivity is unavailable. The password must contain 8-50 characters alphanumeric characters and it is mandatory to create a VM. You can change the password from within the operating system after provisioning, but not through the IONOS Cloud interface.
{% hint style="info" %}
**Note:** Save this password securely. IONOS Cloud never retains passwords after VM generation.
{% endhint %}
{% endtab %}
{% tab title="Own images (private)" %}
Select the image that you have uploaded to the specific data center in IONOS Cloud. A private image is a custom OS image, either from a non-IONOS Cloud source or pre-configured with your own software.
If you have not uploaded any images yet, we recommend uploading your custom images through the File Transfer Protocol (FTP). For more information, see [Private Images](https://docs.ionos.com/sections-test/guides/storage-and-backup/images-snapshots/private-images).
{% endtab %}
{% tab title="Snapshots" %}
Select a custom snapshot from the drop-down list to create a new instance from a previously created snapshot. Only snapshots created in the same region as your data center configuration will display in the list. Snapshots from other regions are not listed. For more information, see \[Snapshots]\(../../storage-&-backup/images-snapshots/snapshots/snapshots.md).
{% endtab %}
{% endtabs %}
5\. **Add another data volume:** *(Optional)* Click **Add another data volume** to add an additional volume when you want to store data on a volume separate from your boot device. In the **Add another data volume** view, specify a name, select the type, and specify the size. Click **Save** to confirm.

#### Enable backup to secure your data
{% hint style="info" %}
**Note:** This option is available for instances created from IONOS public images. It is not available for instances that are using private images, or own images, or snapshots. However, for these instances, you can install the backup agent manually after creation. For more information, see [Install Acronis Backup Agent on Windows Server](https://docs.ionos.com/sections-test/guides/storage-and-backup/backup-service/how-tos/install-acronis-backup-agent-windows) and [Install Acronis Backup Agent on Linux](https://docs.ionos.com/sections-test/guides/storage-and-backup/backup-service/how-tos/install-acronis-backup-agent).
{% endhint %}
The Xpress mode automatically [creates a backup unit](https://docs.ionos.com/sections-test/guides/storage-and-backup/backup-service) and adds the instance to the newly created backup unit. After provisioning, you can [access and manage the backup unit](https://docs.ionos.com/sections-test/guides/storage-and-backup/backup-service/how-tos/manage-backup-units) from the **Backup Service Console**. Enable this feature for production environments that require disaster recovery or for any VM with critical or irreplaceable data.

{% hint style="info" %}
**Note:** Backup supports **Public LAN type** as it requires internet connectivity to access backup storage.
{% endhint %}
#### Advanced settings to connect to your VMs
Connect to your VMs securely using either [Secure Shell (SSH) key](https://docs.ionos.com/sections-test/guides/compute-services/cubes/dcd-how-tos/connect-vm-via-ssh) or [Cloud-init script](https://docs.ionos.com/sections-test/guides/compute-services/cubes/dcd-how-tos/boot-cloud-init).
{% hint style="info" %}
**Note:** This option is available for Linux-based VMs only and is not applicable to Windows-based VMs.
{% endhint %}
{% tabs %}
{% tab title="SSH key" %}
\*\*SSH Keys\*\* provide secure access to Linux VMs using public key authentication. To set up SSH key authentication, first generate an SSH key pair if you do not have one, then paste your public key into the provided field, and connect to your VM using your private key.
1\. Select the **SSH key** tab and click **Add SSH key**.
2\. In the **Add SSH Key** view, you can paste your generated public key or press and drag the file containing the SSH key.
3\. Click **Add key**.

{% endtab %}
{% tab title="Cloud-init Script" %}
\*\*Cloud-init\*\* is an industry-standard method for VM initialization, best-suited for automated deployments, infrastructure-as-code, and configuration management. It enables you to automate user creation and SSH key injection, install packages, execute scripts on first boot, and configure network settings.
1\. Select the **Cloud init script** tab and click **Add cloud-init Script**.
2\. In the **Add Cloud-init Script** view, you can paste your key or press and drag the file containing the cloud-init script.
3\. Click **Add script**.

{% endtab %}
{% endtabs %}
#### Network Interface
You can configure how your VMs connect to the internet. For more information, see [VDC Networking](https://docs.ionos.com/sections-test/guides/network-services/vdc-networking).
1\. **LAN type:** Select a network connection:
* **Public**: Select this option if you want the VMs to be directly accessible from the internet. Ensure that you configure a firewall for security reasons.
* **Private**: Select this option if you want the VMs to be accessible from the internal network but not accessible from the internet. It ensures maximum protection without public exposure.
{% hint style="info" %}
**Note:** The **Private LAN** option is available only when **Enable backup** is not selected, because backup requires **Public LAN type** for internet access to backup storage.
{% endhint %}
For more information about network connectivity, see [Configure a Private LAN](https://docs.ionos.com/sections-test/guides/network-services/vdc-networking/lan/how-tos/configure-private-lan).
2\. **IP Address:** This option is availble only for **Public LAN** types:
* **Dynamic (DHCP) IP**: Select this option if you want automatically assigned IP addresses for your VMs. Note that the IP addresses may change each time the VM is restarted.
* **Fixed IP**: Select this option if you want fixed IP addresses allocated for your VMs. Note that this selection incurs additional costs per instance. For more information, see [IP Addresses](https://docs.ionos.com/sections-test/guides/network-services/vdc-networking/ip-address).
3\. **Firewall:** Enable or deactivate the firewall rules.
* **Disabled or Enabled:** The firewall is deactivated by default. To activate firewall rules for the selected network interface, toggle the status to **Enabled**. When enabled, the default rules are applied. You can modify or delete these preset rules or add custom rules as necessary to meet your application's security requirements.
* **Add another firewall rule:** Click **Add another firewall rule** to define rules that allow specific traffic.
* In the **Add another firewall rule** view, enter the necessary details and select **Add rule**.
* You can also **Edit** or **Delete** the rules after their configuration by selecting the respective options from the **ACTIONS** column. For more information, see [NIC-based Firewall](https://docs.ionos.com/sections-test/guides/network-services/vdc-networking/firewall).

#### Confirm creation
1\. Before clicking **Create**, review the **Summary** section on the right side of the screen:
* **Configuration summary:** Review your configured settings. Select [Virtual Data Center](#select-the-virtual-data-center-vdc), [VM configuration](#configure-a-virtual-machine-vm), [Volume](#add-storage-to-your-chosen-vm), or [Network](#network-interface) to navigate directly to the respective section and make changes, if necessary.
* **Multi-instance deployment:** Create up to the maximum number of data center instances allowed by your contract limits, all with identical configurations. This feature accelerates deployment by provisioning redundant instances in a single batch, which is ideal for rapidly setting up high-availability environments within the same VDC and LAN.
* **Estimated costs:** Verify the total cost of your selected resources calculated on an hourly or monthly (30-day) basis. This calculation does not include usage-dependent costs such as backup or traffic, as these charges are based on your individual consumption.
2\. Select **Create** to confirm.

{% hint style="success" %}
**Result:** The data center and all configured resources are automatically provisioned. It is mandatory that the browser tab or the page remains open, and you must stay online until provisioning completes. VMs will start automatically unless you specify otherwise. For more information about adding additional elements, see [Next steps (Post-provisioning)](#next-steps).
{% endhint %}
## Option 2: From the DCD home page
Alternatively, you can also create a data center using the following option:
1\. In the **DCD**, go to the **My Virtual Data Centers** section, and select **Xpress** from the **Create mode** drop-down list.
{% hint style="success" %}
**Result:** The label changes to **Create in Xpress**.
{% endhint %}

2\. Follow the steps mentioned in [Option 1: From the left navigation panel](#option-1-from-the-left-navigation-panel).
3\. Select **Create** to confirm.
## Next steps
To add more elements after provisioning, switch to the **Canvas** mode. Press and drag resources from the **Palette** on the left into the **Workspace** to design your infrastructure, configure each resource, and click **Provision** to deploy your changes. For details, see [Configure a Data Center](https://docs.ionos.com/sections-test/guides/set-up-ionos-cloud/get-started/configure-data-center).