# Set Up a Secondary Zone
This tutorial explains how to set up a secondary zone in IONOS Cloud by running a BIND9 server on an Ubuntu operating system.
## Target audience
This tutorial is intended to help both developers and technical decision-makers.
## What will you learn
By the end of the tutorial, you will learn how to set up the following:
1. Set up a Dedicated Core server in IONOS Cloud.
2. Configure a primary nameserver on a [Dedicated Core Server](https://docs.ionos.com/support/general-information/glossary-of-terms#dedicated-core-server) in IONOS Cloud running a BIND9 server on an Ubuntu operating system.
3. Create a secondary zone using IONOS Cloud DNS API.
4. Establish and verify the zone transfer between primary and secondary zones.
## Procedure
{% stepper %}
{% step %}
#### Set up a Dedicated Core Server in IONOS Cloud
{% hint style="info" %}
**Note:**
* The user who creates the server has full root or administrator access rights. A server, once provisioned, retains all its settings (resources, drive allocation, password, and so on), even after server restart at the operating system level.
* The server will only be removed from your virtual data center once you delete it in the DCD.
{% endhint %}
To set up a Dedicated Core server in IONOS Cloud, follow these steps:
**1. Create a Dedicated Core server**
Create a Dedicated Core server and configure the server in the **Settings** tab by following the steps in [Create a Dedicated Core Server](https://docs.ionos.com/cloud/compute-services/compute-engine/how-tos/set-up-dedicated-core#create-a-dedicated-core-server).
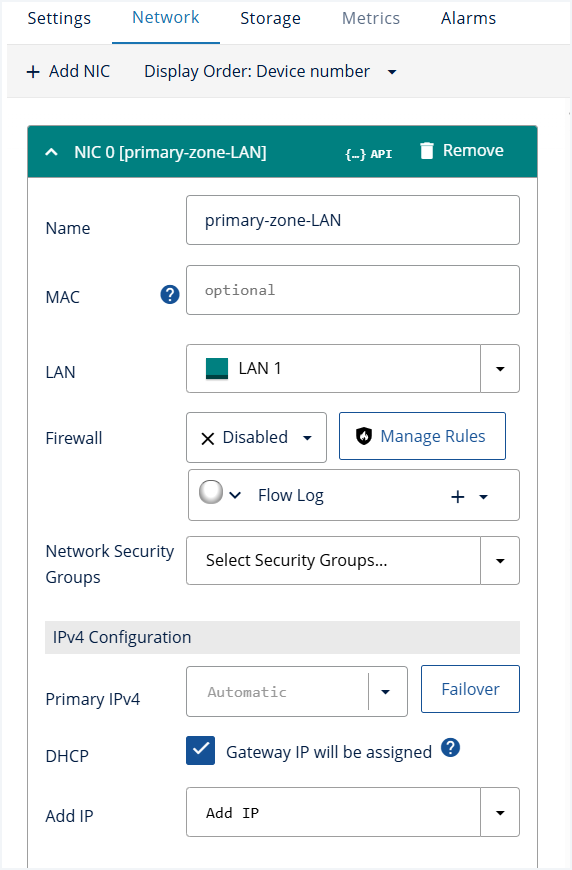
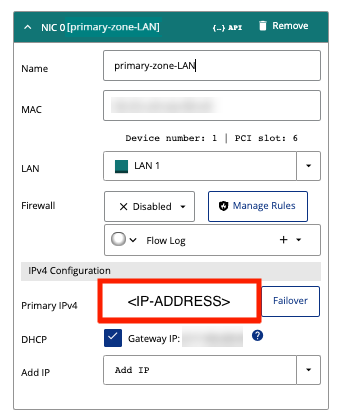
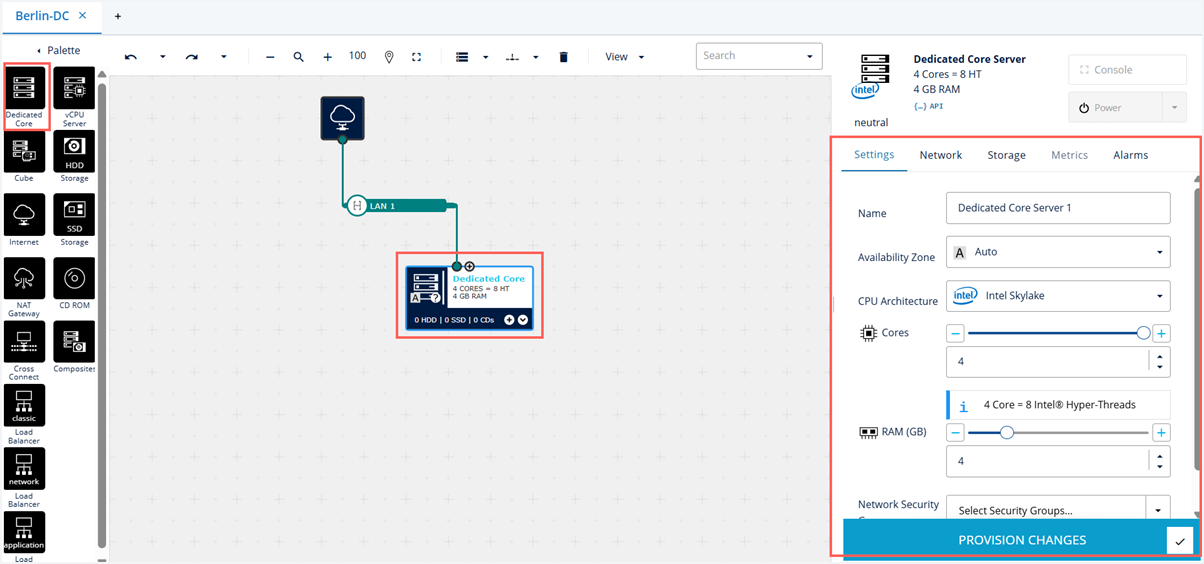 **2. Dedicated Core Server network settings**
In the [DCD](https://docs.ionos.com/cloud/set-up-ionos-cloud/data-center-designer) > **Inspector** pane on the right, configure the following network details in the **Network** tab.
1\. **Name:** Choose a name unique to this [Virtual Data Center (VDC)](https://docs.ionos.com/support/general-information/glossary-of-terms#virtual-data-center-vdc).
2\. **MAC:** Assigned on VM creation.
3\. **LAN:** Select the LAN connection that is connected to the internet, by default LAN 1.
4\. **Firewall:** By default, the firewall is disabled. To enable firewall rules, make sure that incoming and outgoing traffic is allowed on port 53 for UDP and TCP.
5\. **IPv4 Configuration:** Leave to default values.
**2. Dedicated Core Server network settings**
In the [DCD](https://docs.ionos.com/cloud/set-up-ionos-cloud/data-center-designer) > **Inspector** pane on the right, configure the following network details in the **Network** tab.
1\. **Name:** Choose a name unique to this [Virtual Data Center (VDC)](https://docs.ionos.com/support/general-information/glossary-of-terms#virtual-data-center-vdc).
2\. **MAC:** Assigned on VM creation.
3\. **LAN:** Select the LAN connection that is connected to the internet, by default LAN 1.
4\. **Firewall:** By default, the firewall is disabled. To enable firewall rules, make sure that incoming and outgoing traffic is allowed on port 53 for UDP and TCP.
5\. **IPv4 Configuration:** Leave to default values.
 {% hint style="success" %}
**Expected result:** The **Network** settings for a Dedicated Core server are configured.
{% endhint %}
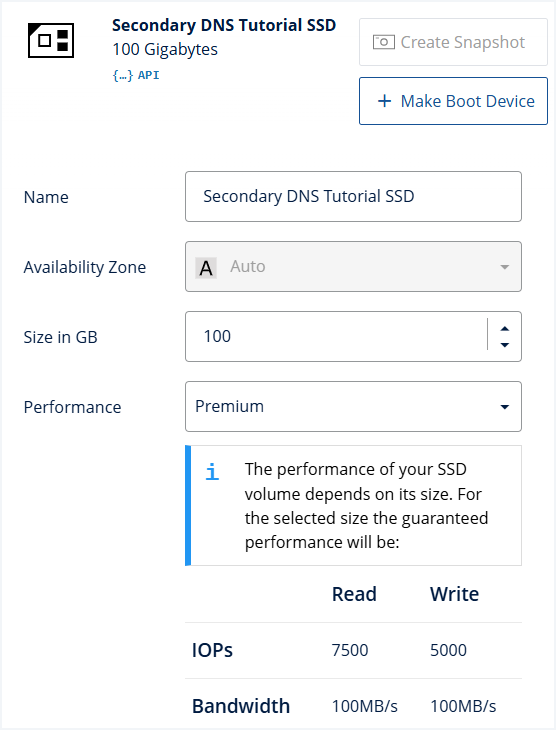
**3. Dedicated Core Server storage settings**
{% hint style="warning" %}
**Warning:** The storage type cannot be changed after provisioning.
{% endhint %}
In the [DCD](https://docs.ionos.com/cloud/set-up-ionos-cloud/data-center-designer) > **Inspector** pane on the right, configure the following storage details in the **Storage** tab.
1\. Click **SSD** and a new pop-up window **Create New Attached Storage** appears.
2\. Configure the following storage details:
* **Name:** Enter a name that is unique within your VDC.
* **Availability Zone:** Leave on "Auto".
* **Size in GB:** Enter "30" which is sufficient for this tutorial.
* **Performance:** Select "Standard".
{% hint style="success" %}
**Expected result:** The **Network** settings for a Dedicated Core server are configured.
{% endhint %}
**3. Dedicated Core Server storage settings**
{% hint style="warning" %}
**Warning:** The storage type cannot be changed after provisioning.
{% endhint %}
In the [DCD](https://docs.ionos.com/cloud/set-up-ionos-cloud/data-center-designer) > **Inspector** pane on the right, configure the following storage details in the **Storage** tab.
1\. Click **SSD** and a new pop-up window **Create New Attached Storage** appears.
2\. Configure the following storage details:
* **Name:** Enter a name that is unique within your VDC.
* **Availability Zone:** Leave on "Auto".
* **Size in GB:** Enter "30" which is sufficient for this tutorial.
* **Performance:** Select "Standard".
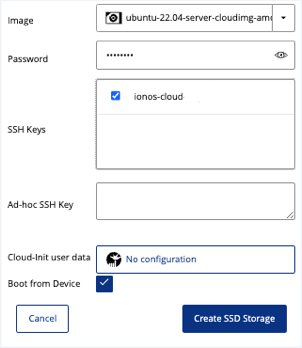
 * **Image:** You can select one of IONOS Cloud images or snapshots, or use your own. For this tutorial, select `ubuntu-24.04-server-cloudimg-amd64` under IONOS Cloud Images.
* **Password:** Create a password for the "root" user of the server. You will need this password to SSH and make changes.
* **SSH Keys:** Select an SSH key stored in the SSH Key Manager.
* **Ad-hoc SSH Key:** If you have not created an SSH key, copy and paste the public part of your SSH key into this field.
* **Cloud-Init user data:** Leave on "No configuration".
* **Boot from Device:** Select this checkbox to make the SSD drive bootable.
* **Image:** You can select one of IONOS Cloud images or snapshots, or use your own. For this tutorial, select `ubuntu-24.04-server-cloudimg-amd64` under IONOS Cloud Images.
* **Password:** Create a password for the "root" user of the server. You will need this password to SSH and make changes.
* **SSH Keys:** Select an SSH key stored in the SSH Key Manager.
* **Ad-hoc SSH Key:** If you have not created an SSH key, copy and paste the public part of your SSH key into this field.
* **Cloud-Init user data:** Leave on "No configuration".
* **Boot from Device:** Select this checkbox to make the SSD drive bootable.
 3\. Click **Create SSD Storage** to create the SSD storage.
{% hint style="success" %}
**Expected result:** The **Storage** settings for a Dedicated Core server are configured.
{% endhint %}
**4. Provision changes and start the Dedicated Core Server**
1\. Select the newly created Dedicated Core server.
2\. From the **Settings** tab in the Inspector pane, select **Power** > **Start**.
3\. Click **Provision Changes** in the lower right corner and then click **Provision Now**.
{% hint style="success" %}
**Expected result:** The Dedicated Core server is provisioned and started.
{% endhint %}
**Next steps:** After your changes are provisioned and the server is started, select your Dedicated Core server, click the **Network** tab in the **Inspector** pane and copy the IPv4 address.
3\. Click **Create SSD Storage** to create the SSD storage.
{% hint style="success" %}
**Expected result:** The **Storage** settings for a Dedicated Core server are configured.
{% endhint %}
**4. Provision changes and start the Dedicated Core Server**
1\. Select the newly created Dedicated Core server.
2\. From the **Settings** tab in the Inspector pane, select **Power** > **Start**.
3\. Click **Provision Changes** in the lower right corner and then click **Provision Now**.
{% hint style="success" %}
**Expected result:** The Dedicated Core server is provisioned and started.
{% endhint %}
**Next steps:** After your changes are provisioned and the server is started, select your Dedicated Core server, click the **Network** tab in the **Inspector** pane and copy the IPv4 address.
 {% hint style="success" %}
**Expected result:** A Dedicated Core Server is set up and started along with the configuration of **Settings**, **Network**, and **Storage** setup.
{% endhint %}
{% endstep %}
{% step %}
#### Configure a Dedicated Core Server as a primary nameserver
{% hint style="info" %}
**Prerequisite:** A Dedicated Core server in IONOS Cloud needs to be set up and you must have the IPv4 address of the server.
{% endhint %}
To configure a Dedicated Core server and enable it to act as the primary nameserver, follow these steps:
1\. SSH into the newly created Dedicated Core server.
```bash
ssh root@
```
2\. Connect to the newly created server via SSH.
```bash
sudo -i
apt update -y
[...]
apt install -y bind9 bind9utils
[...]
```
3\. Proceed with configuring bind9 and your primary zone.
```bash
vi /etc/bind/named.conf.local
```
4\. Configure notify to the IONOS Cloud DNS anycast nameserver and allow zone update from localhost.
{% hint style="info" %}
**Note:** For sending DNS notify messages, IONOS Cloud DNS uses the following Anycast addresses: IPv4 `212.227.123.25` or IPv6 `2001:8d8:fe:53::5cd:25`.
{% endhint %}
```bash
logging {
category xfer-out { default_syslog; };
category xfer-in { default_syslog; };
category notify { default_syslog; };
category lame-servers { default_syslog; };
category general { default_syslog; };
category default { default_syslog; };
};
zone "primary-zone.de" IN {
type master;
file "/var/cache/bind/primary-zone.de.db";
notify explicit;
also-notify { 212.227.123.25; };
allow-update { 127.0.0.1; };
};
```
5\. Create your primary zone.
```bash
vi /var/cache/bind/primary-zone.de.db
```
6\. Edit the zone file.
```bash
; Zone: primary-zone.de
; Exported: Mon Aug 17 22:36:11 UTC 2023
$ORIGIN primary-zone.de.
$TTL 3600
@ 3600 IN SOA primary-zone.de. hostmaster.primary-zone.de. (
2017060104 ; serial
28800 ; refresh
7200 ; retry
604800 ; expire
600 ) ; minimum
@ 3600 IN NS ns.ui-global-dns.com.
@ 3600 IN NS ns.ui-global-dns.de.
@ 3600 IN NS ns.ui-global-dns.org.
@ 3600 IN NS ns.ui-global-dns.biz.
www 60 IN A 127.0.0.1
www 60 IN AAAA ::1
```
7\. Save your changes and quit the Vim editor.
8\. Check the configuration, reload bind, and verify that the configured primary zone is working.
```bash
named-checkconf
systemctl reload named
dig +short primary-zone.de
```
{% hint style="success" %}
**Expected result:** The Dedicated Core server is configured as the primary nameserver in IONOS Cloud running a bind9 server on an Ubuntu operating system.
{% endhint %}
{% endstep %}
{% step %}
#### Create a secondary zone in IONOS Cloud DNS
{% hint style="info" %}
**Prerequisite:** A Dedicated Core server in IONOS Cloud is set up as a primary nameserver.
{% endhint %}
{% tabs %}
{% tab title="Request" %}
To create a secondary zone in the IONOS Cloud DNS by using the REST API, follow this step:
* Send a `POST` request to the `/secondaryzones` endpoint.
```bash
curl --location 'https://dns.de-fra.ionos.com/secondaryzones' \
--header 'Content-Type: application/json' \
--header 'Authorization: Bearer eyJ0eXAiOiJKV1QiLCJraWQiO' \
--data '{
"properties": {
"zoneName": "primary-zone.de",
"description": "This is a secondary zone for primary-zone.de in IONOS Cloud DNS",
"primaryIps": [
""
]
}
}'
```
{% endtab %}
{% tab title="Response" %}
```bash
{
"id": "bdae7da0-0363-49d7-929d-92992786efe1",
"type": "secondaryzone",
"href": "/secondaryzones/bdae7da0-0363-49d7-929d-92992786efe1",
"metadata": {
"createdDate": "2023-08-06T19:36:58+00:00",
"lastModifiedDate": "2023-08-06T19:36:59+00:00",
"nameservers": [
"nscs.ui-dns.com",
"nscs.ui-dns.de",
"nscs.ui-dns.org",
"nscs.ui-dns.biz"
],
"state": "AVAILABLE"
},
"properties": {
"description": "This is a secondary zone for test-dns-public.info in IONOS Cloud DNS",
"primaryIps": [
""
],
"zoneName": "test-dns-public.info"
}
}
```
{% endtab %}
{% endtabs %}
{% hint style="success" %}
**Expected result:** A secondary zone in IONOS Cloud DNS is successfully created using a `POST` request.
{% endhint %}
{% endstep %}
{% step %}
#### Verify zone transfer
{% tabs %}
{% tab title="Request" %}
On the primary nameserver, you can verify the zone transfer in the logs by executing the following command:
```bash
journalctl --unit named --follow
Aug 07 14:43:39 ubuntu named[2666]: client @0x7f467825b958 212.227.123.26#33308 (primary-zone.de): transfer of 'primary-zone.de/IN': AXFR started (serial 2017060104)
Aug 07 14:43:39 ubuntu named[2666]: client @0x7f467825b958 212.227.123.26#33308 (primary-zone.de): transfer of 'primary-zone.de/IN': AXFR ended: 1 messages, 8 records, 299 bytes, 0.001 secs (299000 bytes/sec) (serial 2017060104)
```
You can also verify zone transfer status using IONOS Cloud DNS API:
```bash
curl --location 'https://dns.de-fra.ionos.com/secondaryzones/bdae7da0-0363-49d7-929d-92992786efe1/axfr' \
--header 'Authorization: Bearer eyJ0eXAiOiJKV1QiLCJraWQiO'
```
{% endtab %}
{% tab title="Response" %}
On success response: **200 OK**
```bash
{
"items": [
{
"errorMessage": "",
"primaryIp": "",
"status": "OK"
}
],
"type": "collection"
}
```
{% hint style="success" %}
**Expected result:** The zone transfer between primary and secondary zones is successfully verified.
{% endhint %}
{% endtab %}
{% endtabs %}
**Add a record**
To add a record, follow these steps:
1\. On the primary nameserver, update the zone with a new record setting—A record to a TEST-NET-3 IP address:
```bash
dig +short www. primary-zone.de @ns.ui-global-dns.com
217.160.0.148
nsupdate
> server 127.0.0.1
> zone primary-zone.de
> update add www2.primary-zone.de. 600 IN A 203.0.113.1
> send
> quit
```
2\. Resolve the new record locally.
```bash
dig +short www2.primary-zone.de @127.0.0.1
203.0.113.1
```
3\. View the logs which show that a notification is sent to the secondary zone for the new record.
```bash
Aug 07 16:00:22 ubuntu named[2666]: client @0x7f467000d0a8 127.0.0.1#34056: updating zone 'primary-zone.de/IN': adding an RR at 'www2.primary-zone.de' A 203.0.113.1
Aug 07 16:00:22 ubuntu named[2666]: zone primary-zone.de/IN: sending notifies (serial 2017060105)
```
4\. Using Cloud DNS API, verify that the newly added record is transferred to the secondary zone.
```bash
curl --location 'https://dns.de-fra.ionos.com/secondaryzones/bdae7da0-0363-49d7-929d-92992786efe1/records' \
--header 'Authorization: Bearer eyJ0eXAiOiJKV1QiLCJraWQiO'
```
```bash
{
"id": "bdae7da0-0363-49d7-929d-92992786efe1",
"type": "collection",
"href": "/secondaryzones/bdae7da0-0363-49d7-929d-92992786efe1/records?limit=100&offset=0",
"metadata": {
"primaryIps": [
""
]
},
"items": [
{
"type": "record",
"metadata": {
"fqdn": "primary-zone.de",
"zoneId": "bdae7da0-0363-49d7-929d-92992786efe1",
"rootName": "primary-zone.de"
},
"properties": {
"content": "primary-zone.de hostmaster.primary-zone.de 2017060105 28800 7200 604800 600",
"enabled": true,
"name": "",
"priority": 0,
"ttl": 3600,
"type": "SOA"
}
},
{
"type": "record",
"metadata": {
"fqdn": "primary-zone.de",
"zoneId": "bdae7da0-0363-49d7-929d-92992786efe1",
"rootName": "primary-zone.de"
},
"properties": {
"content": "ns.ui-global-dns.de",
"enabled": true,
"name": "",
"priority": 0,
"ttl": 3600,
"type": "NS"
}
},
{
"type": "record",
"metadata": {
"fqdn": "primary-zone.de",
"zoneId": "bdae7da0-0363-49d7-929d-92992786efe1",
"rootName": "primary-zone.de"
},
"properties": {
"content": "ns.ui-global-dns.biz",
"enabled": true,
"name": "",
"priority": 0,
"ttl": 3600,
"type": "NS"
}
},
{
"type": "record",
"metadata": {
"fqdn": "primary-zone.de",
"zoneId": "bdae7da0-0363-49d7-929d-92992786efe1",
"rootName": "primary-zone.de"
},
"properties": {
"content": "ns.ui-global-dns.com",
"enabled": true,
"name": "",
"priority": 0,
"ttl": 3600,
"type": "NS"
}
},
{
"type": "record",
"metadata": {
"fqdn": "primary-zone.de",
"zoneId": "bdae7da0-0363-49d7-929d-92992786efe1",
"rootName": "primary-zone.de"
},
"properties": {
"content": "ns.ui-global-dns.org",
"enabled": true,
"name": "",
"priority": 0,
"ttl": 3600,
"type": "NS"
}
},
{
"type": "record",
"metadata": {
"fqdn": "www.primary-zone.de",
"zoneId": "bdae7da0-0363-49d7-929d-92992786efe1",
"rootName": "primary-zone.de"
},
"properties": {
"content": "127.0.0.1",
"enabled": true,
"name": "www",
"priority": 0,
"ttl": 3600,
"type": "A"
}
},
{
"type": "record",
"metadata": {
"fqdn": "www.primary-zone.de",
"zoneId": "bdae7da0-0363-49d7-929d-92992786efe1",
"rootName": "primary-zone.de"
},
"properties": {
"content": "0:0:0:0:0:0:0:1",
"enabled": true,
"name": "www",
"priority": 0,
"ttl": 3600,
"type": "AAAA"
}
},
{
"type": "record",
"metadata": {
"fqdn": "www2.primary-zone.de",
"zoneId": "bdae7da0-0363-49d7-929d-92992786efe1",
"rootName": "primary-zone.de"
},
"properties": {
"content": "203.0.113.1",
"enabled": true,
"name": "www2",
"priority": 0,
"ttl": 3600,
"type": "A"
}
}
],
"offset": 0,
"limit": 100,
"_links": {
"self": "/secondaryzones/bdae7da0-0363-49d7-929d-92992786efe1/records?limit=100&offset=0",
"next": "/secondaryzones/bdae7da0-0363-49d7-929d-92992786efe1/records?limit=100&offset=100"
}
}
```
5\. Globally resolve a new record from the IONOS Cloud DNS anycast network by using the following command:
```bash
dig +short www2.primary-zone.de @ns.ui-global-dns.com.
```
{% endstep %}
{% endstepper %}
### Final result
By following this tutorial, you have successfully set up a secondary DNS zone in IONOS Cloud using a BIND9 server on Ubuntu. You can now manage DNS records on your primary nameserver and ensure reliable zone transfers to the secondary zone.
## Conclusion
In this tutorial, you learned how to set up a secondary DNS zone in IONOS Cloud with BIND9 on Ubuntu. By following the steps, you can efficiently manage DNS records and automate zone transfers between primary and secondary servers.
{% hint style="success" %}
**Expected result:** A Dedicated Core Server is set up and started along with the configuration of **Settings**, **Network**, and **Storage** setup.
{% endhint %}
{% endstep %}
{% step %}
#### Configure a Dedicated Core Server as a primary nameserver
{% hint style="info" %}
**Prerequisite:** A Dedicated Core server in IONOS Cloud needs to be set up and you must have the IPv4 address of the server.
{% endhint %}
To configure a Dedicated Core server and enable it to act as the primary nameserver, follow these steps:
1\. SSH into the newly created Dedicated Core server.
```bash
ssh root@
```
2\. Connect to the newly created server via SSH.
```bash
sudo -i
apt update -y
[...]
apt install -y bind9 bind9utils
[...]
```
3\. Proceed with configuring bind9 and your primary zone.
```bash
vi /etc/bind/named.conf.local
```
4\. Configure notify to the IONOS Cloud DNS anycast nameserver and allow zone update from localhost.
{% hint style="info" %}
**Note:** For sending DNS notify messages, IONOS Cloud DNS uses the following Anycast addresses: IPv4 `212.227.123.25` or IPv6 `2001:8d8:fe:53::5cd:25`.
{% endhint %}
```bash
logging {
category xfer-out { default_syslog; };
category xfer-in { default_syslog; };
category notify { default_syslog; };
category lame-servers { default_syslog; };
category general { default_syslog; };
category default { default_syslog; };
};
zone "primary-zone.de" IN {
type master;
file "/var/cache/bind/primary-zone.de.db";
notify explicit;
also-notify { 212.227.123.25; };
allow-update { 127.0.0.1; };
};
```
5\. Create your primary zone.
```bash
vi /var/cache/bind/primary-zone.de.db
```
6\. Edit the zone file.
```bash
; Zone: primary-zone.de
; Exported: Mon Aug 17 22:36:11 UTC 2023
$ORIGIN primary-zone.de.
$TTL 3600
@ 3600 IN SOA primary-zone.de. hostmaster.primary-zone.de. (
2017060104 ; serial
28800 ; refresh
7200 ; retry
604800 ; expire
600 ) ; minimum
@ 3600 IN NS ns.ui-global-dns.com.
@ 3600 IN NS ns.ui-global-dns.de.
@ 3600 IN NS ns.ui-global-dns.org.
@ 3600 IN NS ns.ui-global-dns.biz.
www 60 IN A 127.0.0.1
www 60 IN AAAA ::1
```
7\. Save your changes and quit the Vim editor.
8\. Check the configuration, reload bind, and verify that the configured primary zone is working.
```bash
named-checkconf
systemctl reload named
dig +short primary-zone.de
```
{% hint style="success" %}
**Expected result:** The Dedicated Core server is configured as the primary nameserver in IONOS Cloud running a bind9 server on an Ubuntu operating system.
{% endhint %}
{% endstep %}
{% step %}
#### Create a secondary zone in IONOS Cloud DNS
{% hint style="info" %}
**Prerequisite:** A Dedicated Core server in IONOS Cloud is set up as a primary nameserver.
{% endhint %}
{% tabs %}
{% tab title="Request" %}
To create a secondary zone in the IONOS Cloud DNS by using the REST API, follow this step:
* Send a `POST` request to the `/secondaryzones` endpoint.
```bash
curl --location 'https://dns.de-fra.ionos.com/secondaryzones' \
--header 'Content-Type: application/json' \
--header 'Authorization: Bearer eyJ0eXAiOiJKV1QiLCJraWQiO' \
--data '{
"properties": {
"zoneName": "primary-zone.de",
"description": "This is a secondary zone for primary-zone.de in IONOS Cloud DNS",
"primaryIps": [
""
]
}
}'
```
{% endtab %}
{% tab title="Response" %}
```bash
{
"id": "bdae7da0-0363-49d7-929d-92992786efe1",
"type": "secondaryzone",
"href": "/secondaryzones/bdae7da0-0363-49d7-929d-92992786efe1",
"metadata": {
"createdDate": "2023-08-06T19:36:58+00:00",
"lastModifiedDate": "2023-08-06T19:36:59+00:00",
"nameservers": [
"nscs.ui-dns.com",
"nscs.ui-dns.de",
"nscs.ui-dns.org",
"nscs.ui-dns.biz"
],
"state": "AVAILABLE"
},
"properties": {
"description": "This is a secondary zone for test-dns-public.info in IONOS Cloud DNS",
"primaryIps": [
""
],
"zoneName": "test-dns-public.info"
}
}
```
{% endtab %}
{% endtabs %}
{% hint style="success" %}
**Expected result:** A secondary zone in IONOS Cloud DNS is successfully created using a `POST` request.
{% endhint %}
{% endstep %}
{% step %}
#### Verify zone transfer
{% tabs %}
{% tab title="Request" %}
On the primary nameserver, you can verify the zone transfer in the logs by executing the following command:
```bash
journalctl --unit named --follow
Aug 07 14:43:39 ubuntu named[2666]: client @0x7f467825b958 212.227.123.26#33308 (primary-zone.de): transfer of 'primary-zone.de/IN': AXFR started (serial 2017060104)
Aug 07 14:43:39 ubuntu named[2666]: client @0x7f467825b958 212.227.123.26#33308 (primary-zone.de): transfer of 'primary-zone.de/IN': AXFR ended: 1 messages, 8 records, 299 bytes, 0.001 secs (299000 bytes/sec) (serial 2017060104)
```
You can also verify zone transfer status using IONOS Cloud DNS API:
```bash
curl --location 'https://dns.de-fra.ionos.com/secondaryzones/bdae7da0-0363-49d7-929d-92992786efe1/axfr' \
--header 'Authorization: Bearer eyJ0eXAiOiJKV1QiLCJraWQiO'
```
{% endtab %}
{% tab title="Response" %}
On success response: **200 OK**
```bash
{
"items": [
{
"errorMessage": "",
"primaryIp": "",
"status": "OK"
}
],
"type": "collection"
}
```
{% hint style="success" %}
**Expected result:** The zone transfer between primary and secondary zones is successfully verified.
{% endhint %}
{% endtab %}
{% endtabs %}
**Add a record**
To add a record, follow these steps:
1\. On the primary nameserver, update the zone with a new record setting—A record to a TEST-NET-3 IP address:
```bash
dig +short www. primary-zone.de @ns.ui-global-dns.com
217.160.0.148
nsupdate
> server 127.0.0.1
> zone primary-zone.de
> update add www2.primary-zone.de. 600 IN A 203.0.113.1
> send
> quit
```
2\. Resolve the new record locally.
```bash
dig +short www2.primary-zone.de @127.0.0.1
203.0.113.1
```
3\. View the logs which show that a notification is sent to the secondary zone for the new record.
```bash
Aug 07 16:00:22 ubuntu named[2666]: client @0x7f467000d0a8 127.0.0.1#34056: updating zone 'primary-zone.de/IN': adding an RR at 'www2.primary-zone.de' A 203.0.113.1
Aug 07 16:00:22 ubuntu named[2666]: zone primary-zone.de/IN: sending notifies (serial 2017060105)
```
4\. Using Cloud DNS API, verify that the newly added record is transferred to the secondary zone.
```bash
curl --location 'https://dns.de-fra.ionos.com/secondaryzones/bdae7da0-0363-49d7-929d-92992786efe1/records' \
--header 'Authorization: Bearer eyJ0eXAiOiJKV1QiLCJraWQiO'
```
```bash
{
"id": "bdae7da0-0363-49d7-929d-92992786efe1",
"type": "collection",
"href": "/secondaryzones/bdae7da0-0363-49d7-929d-92992786efe1/records?limit=100&offset=0",
"metadata": {
"primaryIps": [
""
]
},
"items": [
{
"type": "record",
"metadata": {
"fqdn": "primary-zone.de",
"zoneId": "bdae7da0-0363-49d7-929d-92992786efe1",
"rootName": "primary-zone.de"
},
"properties": {
"content": "primary-zone.de hostmaster.primary-zone.de 2017060105 28800 7200 604800 600",
"enabled": true,
"name": "",
"priority": 0,
"ttl": 3600,
"type": "SOA"
}
},
{
"type": "record",
"metadata": {
"fqdn": "primary-zone.de",
"zoneId": "bdae7da0-0363-49d7-929d-92992786efe1",
"rootName": "primary-zone.de"
},
"properties": {
"content": "ns.ui-global-dns.de",
"enabled": true,
"name": "",
"priority": 0,
"ttl": 3600,
"type": "NS"
}
},
{
"type": "record",
"metadata": {
"fqdn": "primary-zone.de",
"zoneId": "bdae7da0-0363-49d7-929d-92992786efe1",
"rootName": "primary-zone.de"
},
"properties": {
"content": "ns.ui-global-dns.biz",
"enabled": true,
"name": "",
"priority": 0,
"ttl": 3600,
"type": "NS"
}
},
{
"type": "record",
"metadata": {
"fqdn": "primary-zone.de",
"zoneId": "bdae7da0-0363-49d7-929d-92992786efe1",
"rootName": "primary-zone.de"
},
"properties": {
"content": "ns.ui-global-dns.com",
"enabled": true,
"name": "",
"priority": 0,
"ttl": 3600,
"type": "NS"
}
},
{
"type": "record",
"metadata": {
"fqdn": "primary-zone.de",
"zoneId": "bdae7da0-0363-49d7-929d-92992786efe1",
"rootName": "primary-zone.de"
},
"properties": {
"content": "ns.ui-global-dns.org",
"enabled": true,
"name": "",
"priority": 0,
"ttl": 3600,
"type": "NS"
}
},
{
"type": "record",
"metadata": {
"fqdn": "www.primary-zone.de",
"zoneId": "bdae7da0-0363-49d7-929d-92992786efe1",
"rootName": "primary-zone.de"
},
"properties": {
"content": "127.0.0.1",
"enabled": true,
"name": "www",
"priority": 0,
"ttl": 3600,
"type": "A"
}
},
{
"type": "record",
"metadata": {
"fqdn": "www.primary-zone.de",
"zoneId": "bdae7da0-0363-49d7-929d-92992786efe1",
"rootName": "primary-zone.de"
},
"properties": {
"content": "0:0:0:0:0:0:0:1",
"enabled": true,
"name": "www",
"priority": 0,
"ttl": 3600,
"type": "AAAA"
}
},
{
"type": "record",
"metadata": {
"fqdn": "www2.primary-zone.de",
"zoneId": "bdae7da0-0363-49d7-929d-92992786efe1",
"rootName": "primary-zone.de"
},
"properties": {
"content": "203.0.113.1",
"enabled": true,
"name": "www2",
"priority": 0,
"ttl": 3600,
"type": "A"
}
}
],
"offset": 0,
"limit": 100,
"_links": {
"self": "/secondaryzones/bdae7da0-0363-49d7-929d-92992786efe1/records?limit=100&offset=0",
"next": "/secondaryzones/bdae7da0-0363-49d7-929d-92992786efe1/records?limit=100&offset=100"
}
}
```
5\. Globally resolve a new record from the IONOS Cloud DNS anycast network by using the following command:
```bash
dig +short www2.primary-zone.de @ns.ui-global-dns.com.
```
{% endstep %}
{% endstepper %}
### Final result
By following this tutorial, you have successfully set up a secondary DNS zone in IONOS Cloud using a BIND9 server on Ubuntu. You can now manage DNS records on your primary nameserver and ensure reliable zone transfers to the secondary zone.
## Conclusion
In this tutorial, you learned how to set up a secondary DNS zone in IONOS Cloud with BIND9 on Ubuntu. By following the steps, you can efficiently manage DNS records and automate zone transfers between primary and secondary servers.